
Advanced cocktail garnishing techniques transform an ordinary drink into a multi-sensory masterpiece.
As any skilled Bartender knows, garnishes have evolved far beyond simple decorative elements. They have become integral components that bridge the gap between visual allure and aromatic profiles.
In this article, we’ll uncover six advanced garnishing techniques for cocktails that will leave a lasting impression on your guests.
1. Smoke-Infused Citrus Art
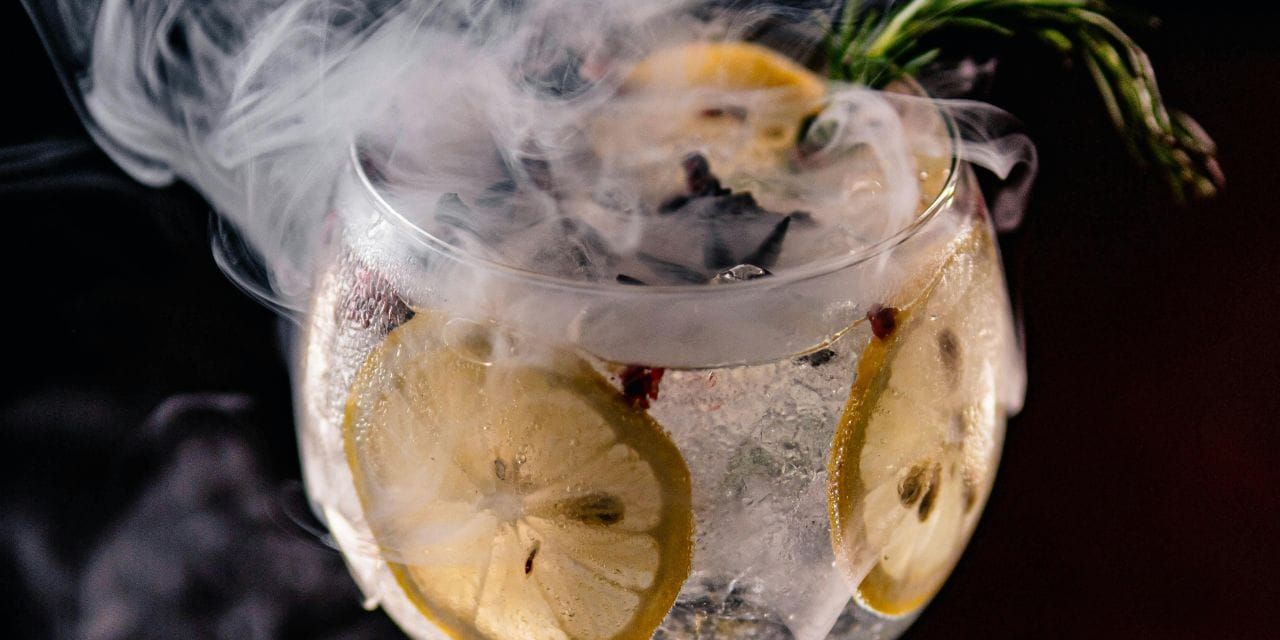
Smoke-infused citrus garnishes add depth and complexity to cocktails through carefully controlled infusion techniques.
The process combines visual appeal with aromatic enhancement, creating a memorable drinking experience.
Essential tools for smoke infusion
Setting up a proper smoke infusion requires a few key tools to ensure great results. First, you’ll need a culinary torch or a butane lighter to light your smoking materials.
A smoking gun with a flexible silicone tube is also important, as it allows you to direct the smoke exactly where you want it.
To keep the smoke contained, a glass cloche or dome works wonders. And don’t forget to have a heat-resistant surface to protect your workspace while you’re working with fire.
Using a timer can really help you keep track of how long the smoke interacts with your drink — too much smoke can easily mask the other flavors.
Step-by-step smoke infusion process
Follow these straightforward steps to make a delicious smoke-infused cocktail:
- Select fresh citrus fruits: Choose organic citrus fruits such as oranges or lemons for optimal flavor.
- Prepare the peel: Using a sharp knife or vegetable peeler, carefully peel a long strip of the citrus peel, ensuring minimal pith remains attached for flavor control.
- Warm the peel: Use a butane torch to gently char the exposed side of the citrus peel. Hold the flame a few inches away to avoid burning it too quickly. The goal is to release the oils and flavors without creating an overpowering charred taste.
- Infuse the cocktail: Hold the charred peel over the cocktail, allowing the smoke to seep into the drink. Timing is key — aim for one to four minutes of exposure to create the perfect balance of smoky flavor.
- Cold smoking technique (optional): For cold smoking, use a smoking device or chamber to fill the drink with smoke without applying heat. This method helps maintain the cocktail's temperature while infusing it with flavor.
- Serve immediately: Once the desired smoke infusion time has passed, remove the peel or smoking apparatus, stir the cocktail gently to blend the flavors and serve immediately for the best experience.
Pairing smoked citrus with different spirits
Dark spirits with brown sugar, honey, caramel or vanilla notes pair exceptionally well with smoked citrus.
Consequently, bourbon and aged whiskeys create harmonious combinations with applewood or cherry wood smoke.
For lighter spirits, citrus smoke adds complexity without overwhelming the base flavors. Mezcal and smoky scotch naturally complement citrus smoke garnishes.

The Fastest Growing
Restaurant & Hospitality Job Platform
Looking for top paid jobs? Or Hiring for your business?
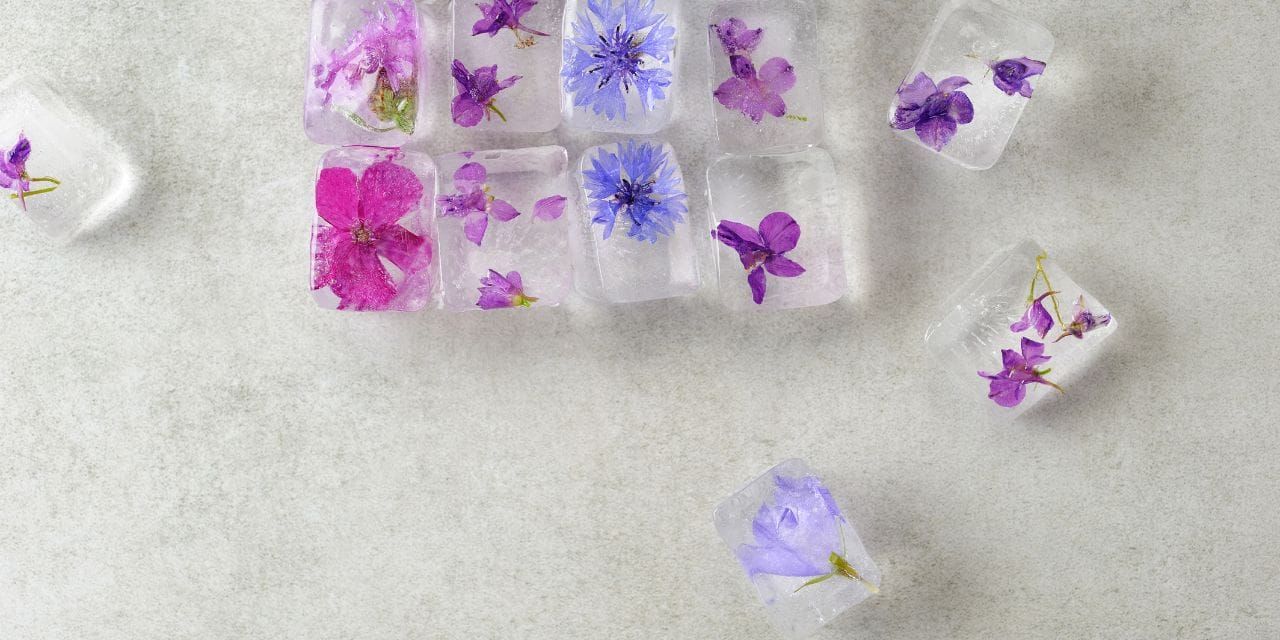
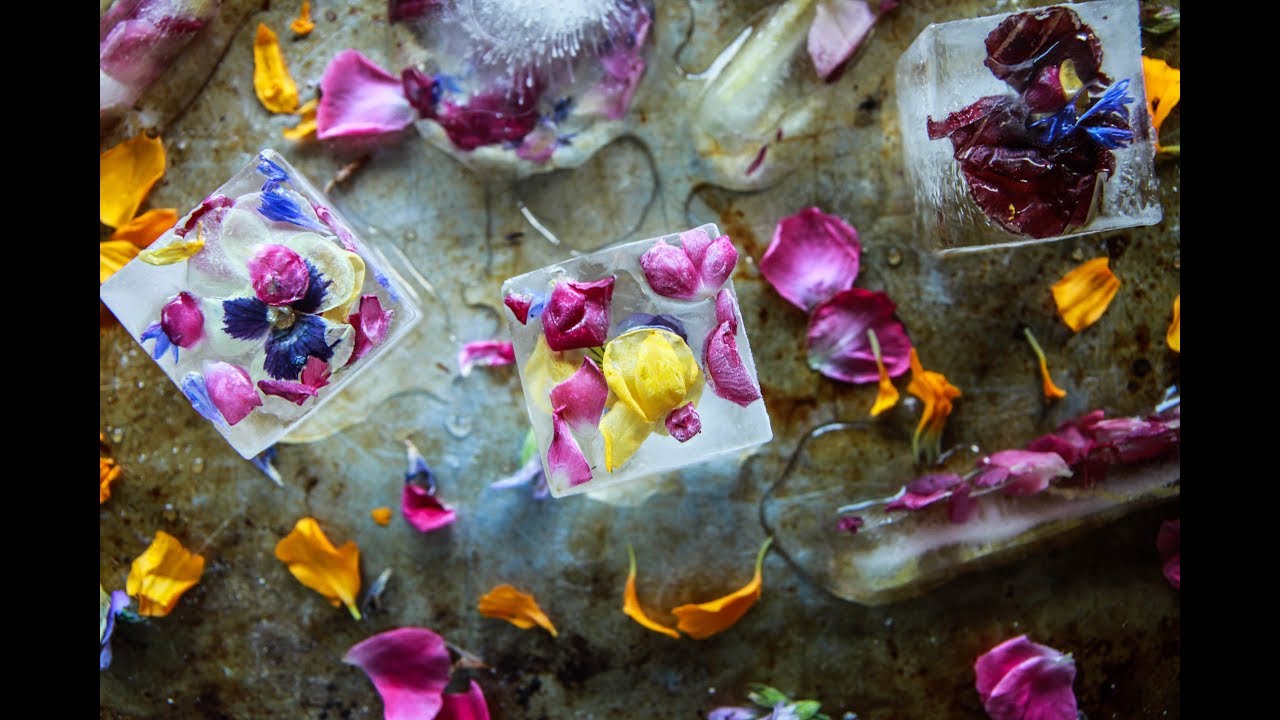
2. Edible Flower Ice Cubes
Creating edible flower ice cubes is a fun and visually stunning way to elevate your cocktails.
This garnishing technique adds both beauty and a touch of flavor, making drinks truly memorable.
Selecting safe edible flowers
When choosing flowers for cocktails, safety is key. Always opt for organic, pesticide-free blooms.
Here are some great options that work well in ice cubes:
- Roses and rose petals
- Hibiscus
- Nasturtium
- Lavender
- Chamomile
- Pansies and violas
It’s wise to avoid flowers from florists or grocery stores unless they are specifically marked as edible, as these often contain pesticides.
You can also use leafy greens to complement the flowers, especially when working with pricier blooms.
Creating crystal-clear ice
The trick to getting crystal-clear ice cubes lies in a method called directional freezing. This technique freezes water from the top down, which helps push impurities to the bottom.
For the best results, start with distilled or ultra-filtered water, and boil it to get rid of any dissolved gases.
Allow approximately 16 to 18 hours for the water to freeze completely. Using silicone molds can significantly help in creating uniform ice cubes.
Once they're frozen, be sure to store the cubes in airtight containers to keep them fresh and free from any odors.
Flower placement techniques
Getting the flower placement right is crucial for a beautiful finish. A handy technique is to fill your mold halfway with water and let it freeze until it’s solid enough to hold the flowers in place.
This way, the blooms won’t just float to the top when you add them.
For the best presentation, place darker foliage at the bottom and put your premium flowers on top.
Spray roses are especially great because they hold their shape during freezing and fit nicely into standard molds.
Seasonal flower combinations
Seasonal flower combinations can be wonderful too! In spring, consider using delicate violets and cherry blossoms, while summer might call for bright nasturtiums and marigolds.
Pairing the right flowers with cocktail flavors is also important. For example, borage goes well with gin and tonics, and the peppery flavor of nasturtium adds a nice touch to Bloody Marys.
Before serving, let the ice cubes sit at room temperature for about two minutes. This helps prevent cracking and allows the outer layer to melt slightly, making your presentation even more beautiful.
For a visual guide on this technique, check out the video below:
3. Dehydrated Fruit Arrangements
Dehydrated fruit arrangements represent a sustainable approach to advanced cocktail garnishing, offering both visual appeal and extended shelf life.
Essentially, these garnishes concentrate flavors while creating striking visual elements for cocktail presentation.
Fruit selection and preparation
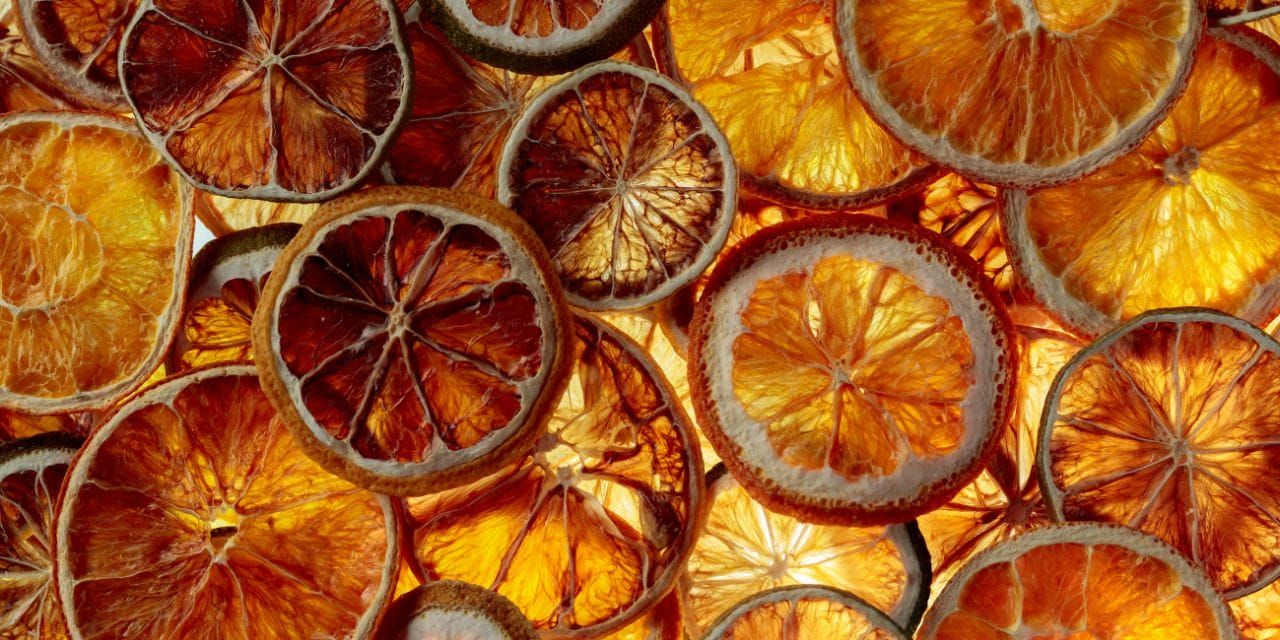
Choosing the right fruits is key to successful dehydration. Citrus fruits are particularly well-suited for this technique, with some great options including:
- Lemons and limes (sliced 1/8 to 1/4 inch thick)
- Oranges (navel or Valencia varieties)
- Grapefruit and blood oranges
- Berries and exotic fruits like starfruit
When you're preparing the fruit, use a sharp knife to make consistent slices; this will help ensure they dehydrate evenly.
Steer clear of thin-skinned fruits like tangerines or mandarins, as they usually don’t dehydrate well.
Dehydration methods
There are two primary methods for dehydrating fruits: the oven method and the use of specialized appliances.
The oven method requires preheating to 200°F–225°F, with drying times ranging from three to five hours. Proper temperature control prevents burning while removing moisture effectively.
Food dehydrators offer more precise control, operating at 130°F–135°F for six to eight hours.
Similarly, air fryers with dehydration functions work at 120°F for approximately 12 hours.
Throughout the process, rotate trays periodically to ensure even drying.
Assembly techniques
Proper storage proves crucial for maintaining dehydrated garnish quality.
Store completely cooled pieces in airtight containers, where they can last up to three years when kept in cool, dry conditions.
For cocktail presentation, these garnishes offer versatility through various assembly methods.
Create dramatic effects by combining different fruit types or incorporating them with other garnish elements.
Altogether, dehydrated fruits can float on drink surfaces, attach to glass rims or serve as sophisticated cocktail picks.
These garnishes maintain their concentrated flavors without diluting drinks, unlike fresh alternatives.
4. Spice-Dusted Rim Art
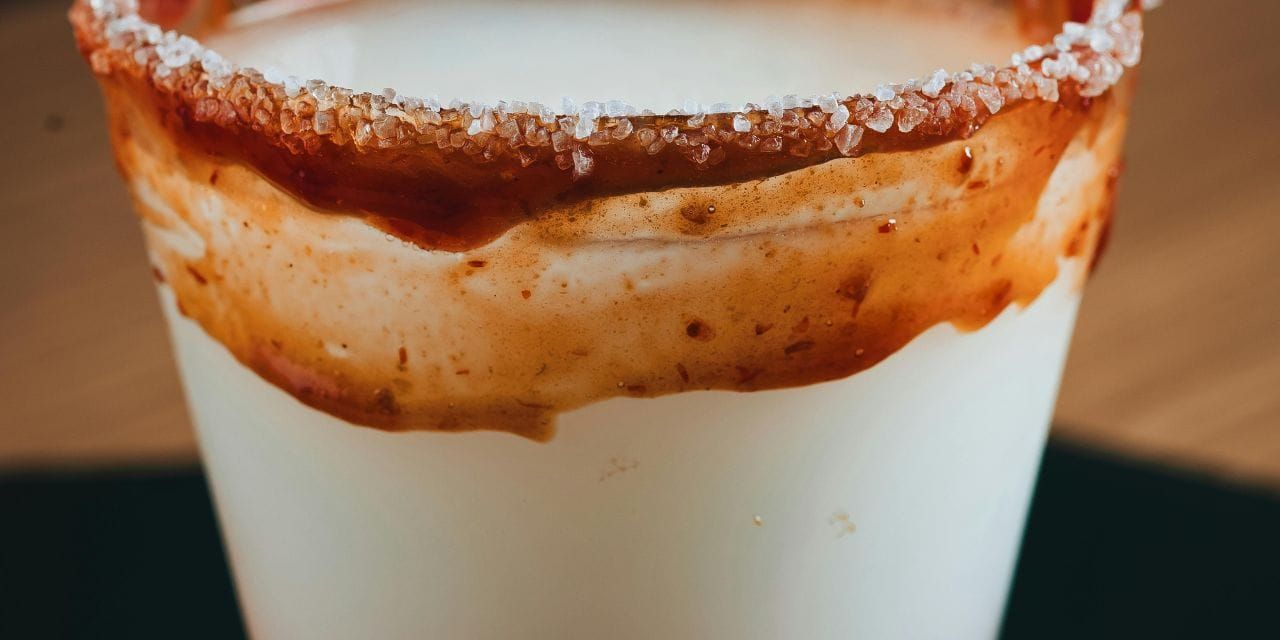
Spice-dusted rims bring global flavors and striking visual elements to the cocktail presentation.
Bartenders worldwide experiment with unique seasonings and grinds, making the rim an essential component of drink flavor profiles.
Spice blend creation
Custom spice blends start with selecting quality base ingredients. Primarily, kosher salt serves as the foundation, occasionally mixed with sugar to balance bitter notes.
Mediterranean influences inspire creative combinations, such as za'atar blends paired with chipotle tequila and mezcal.
Japanese togarashi offers an alternative base, combining red chili pepper, roasted orange peel, black sesame seeds, hemp seed, ground ginger and nori.
For Mexican-inspired drinks, house-made tajin blends incorporate watermelon juice and serrano chile, while red alder wood-smoked black salt adds depth to vermouth-based cocktails.
Application methods
Proper rim adhesion demands precise technique. Fresh citrus proves most effective, with lime wedges creating reliable adhesion for most spice blends.
Alternatively, properly chilled glasses help finer grinds stick naturally without additional moisture.
Professional Bartenders often rim only half the glass circumference, offering guests control over flavor intensity.
This technique simultaneously prevents over-salting while maintaining visual appeal.
To maintain clean and precise rims throughout service, make sure to do occasional touch-ups using slightly moistened napkins.
Pattern techniques
Creative rim patterns emerge through layering different spices. Combining two or three rimming ingredients adds complexity and visual interest.
For instance, mixing crushed dried orange peel with traditional salt creates depth in margarita presentations.
Seasonal variations inspire unique combinations, such as cinnamon-sugar blends for winter cocktails or lavender-salt mixtures for spring offerings.
For storage, airtight containers preserve custom blends for up to one month, though occasional clumping may require breaking up before use.
5. Candied Garnish Creations
[Source: Bite by Michelle]
Candied garnishes blend traditional confectionery techniques with modern cocktail artistry.
Professional Bartenders utilize this method to create sweet, chewy decorations that enhance both the flavor and visual appeal of signature drinks.
Candying process
The foundation of perfect candied garnishes starts with precise fruit selection and preparation.
Primarily, thin-skinned citrus fruits like lemons, oranges and limes work best when sliced to 1/4-inch thickness.
A quick three-minute boil removes bitterness from the fruit's pith, followed by an ice bath to halt the cooking process.
Creating the sugar syrup demands careful attention to ratios. Typically, combine three cups each of granulated sugar and water, maintaining a gentle simmer for one hour while turning fruit slices every 15 minutes.
Throughout this process, avoid boiling the mixture as it can compromise the final texture.
Storage solutions
Proper storage techniques determine the longevity of candied garnishes. Store completely dried pieces between layers of parchment paper in airtight containers.
Naturally, these garnishes maintain their quality for up to three months when kept in cool, dry conditions.
Presentation ideas
Creative presentation transforms candied garnishes into conversation pieces. Professional Bartenders often pair candied ginger with dark and stormy cocktails or Moscow mules.
Alternatively, combine candied citrus with chocolate-based drinks or use it as an elegant addition to fruit-forward cocktails.
The versatility of these garnishes extends beyond simple placement. Ultimately, they can float atop drinks, adorn glass rims or serve as sophisticated cocktail picks.
For special occasions, dip partially dried pieces in dark chocolate or dust with spiced sugar mixtures to create unique flavor combinations.
6. Edible Glitter Garnish
Edible glitter is a playful and eye-catching garnish that adds a touch of magic to cocktails.
Often made from sugar or starch, edible glitter is available in a variety of colors and sizes, allowing mixologists to enhance the visual effect of their drinks creatively.
It sparkles beautifully, catching the light and creating an inviting presentation, making it especially popular for festive occasions and themed events.
Types of edible glitter
If you're looking to add edible glitter to your cocktails, there are several types to consider:
- Fine glitter: This type is perfect for a subtle shimmering effect, easily blending into cocktail surfaces without overwhelming the drink.
- Chunky glitter: Offering a more dramatic look, chunky glitter can create a stunning contrast and is ideal for statement cocktails.
- Metallic glitter: Available in gold, silver and other metallic shades, these glitters add a luxurious touch, elevating the cocktail's overall presentation.
Usage tips
When adding glitter, sprinkle a small amount on top of the drink just before serving to ensure it maintains its sparkle and doesn't settle.
For an extra touch, you can rim the glass with edible glitter by moistening the rim with a citrus wedge or simple syrup and then dipping it into a plate of glitter for even coverage.
Enhance Your Skills and Career With OysterLink
Advanced cocktail garnishing requires precision, creativity and skill from professional Bartenders.
Using the right tools, fresh ingredients and meticulous attention to detail can transform ordinary drinks into memorable experiences.
Safety remains a key priority, whether you’re working with hot sugar art, dry ice or specialized ingredients.
Mastering temperature control and proper storage ensures both visual appeal and guest safety.
Although mastering these techniques takes dedication and practice, the stunning results deliver unique experiences that guests can't easily replicate at home.
For additional insights into bartending techniques, career tips and job listings, be sure to explore OysterLink!
The Fastest Growing
Restaurant & Hospitality Job Platform
Looking for top paid jobs? Or Hiring for your business?

Written by Sasha Vidakovic
Sasha is an experienced writer and editor with over eight years in the industry. Holding a master’s degree in English and Russian, she brings both linguistic expertise and creativity to her role at OysterLink. When she's not working, she enjoys exploring new destinations, with travel being a key part of both her personal and professional growth.


Loading comments...